
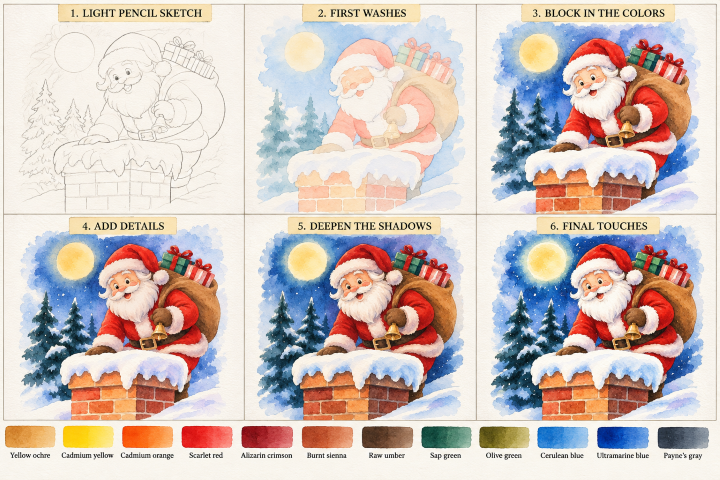
Follow these six steps to paint Santa peeking over a snowy chimney on a moonlit Christmas Eve!
1. Light Pencil Sketch (Skip if you purchased one of our watercolor art kits)
Lightly sketch the large shapes first: the brick chimney, Santa’s body and face, his floppy hat, beard, arms, and mittens. Add the sack of presents over his shoulder, the little bell, the full moon, and evergreen trees in the background. Outline the snow resting on the chimney, keeping the edges irregular and rounded.
Tip: Keep your pencil marks light, especially around Santa’s white beard, hat trim, and the snow.
2. First Washes
Wet your brush and apply a pale wash of Blue and light Blue to the night sky, leaving the moon unpainted. Use diluted Yellow for the moon and a soft golden wash for the chimney bricks. Add very light washes of red to Santa’s suit, brown to his sack, and blue-gray to the snow. Leave the beard, mustache, and fluffy trim mostly white.
Tip: Work around the white areas rather than painting over them. Allow the first washes to dry before adding stronger colors.
3. Block in the Colors
Paint Santa’s suit with dark Red, adding bright red to the darker folds. Use warm peach and light orange for his face and nose. Paint the sack with brown and dark brown, and use green and red for the presents. Build the chimney with alternating washes of orange, red-brown, and yellow bricks. Add dark green washes to the evergreen trees and deeper blues to the sky.
Tip: Keep the first color layers fairly transparent. Let some lighter areas show through to create a natural watercolor effect.
4. Add Details
Once dry, define Santa’s eyes, eyebrows, rosy cheeks, nose, and smiling mouth with a small brush. Add curved strokes to suggest the texture of his beard and mustache, leaving plenty of white paper visible. Paint the sack’s folds, gift ribbons, bell, belt buckle, and individual brick outlines. Add short, tapered strokes to the evergreen branches.
Tip: Use a small round brush for facial features and fine details. Build the beard with soft gray and warm light brown strokes rather than outlining every strand.
5. Deepen the Shadows
Deepen the folds of Santa’s red suit with dark red. Add dark brown to the sack, mittens, belt, and shaded sides of the chimney. Use Gray mixed with Blue for the darkest parts of the night sky and the cool shadows beneath the snow. Add darker green to the trees and shadowed areas between the bricks.
Tip: Place the darkest shadows beneath Santa’s hat, around his arm, under the sack, and below the snowy chimney edge. These contrasts help the subject stand out.
6. Final Touches
Brighten the moon with a soft yellow glaze. Add tiny white dots and stars to the sky using white gouache or by preserving the white paper. Add delicate highlights to Santa’s eyes, nose, bell, and the ribbons on the gifts. Use pale blue-gray strokes beneath the snow to suggest its rounded shape, and add a few final snowflakes across the scene.
Tip: Step back and check the overall balance. Keep the snow and beard light, the suit vibrant red, and the sky deep blue for a festive nighttime glow.
Remember: Work from light to dark, let each layer dry before glazing, and save your strongest darks and brightest highlights for the final steps.