
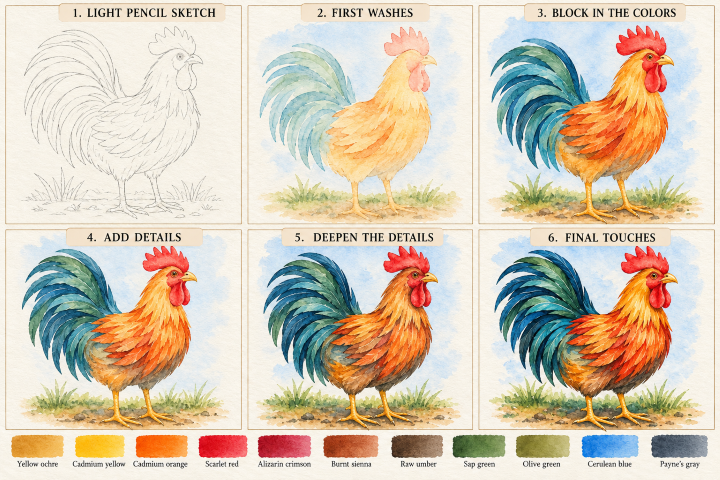
Quick Watercolor Tip: Light vs. Dark Colors
To create light colors, such as light red, add more water and use less pigment. To create dark, rich colors, such as dark blue, use more pigment and less water. You can also mix in a tiny amount of black to darken a color, but use it sparingly—black can quickly overpower the original color and make it look muddy. Add a little at a time until you achieve the shade you want.
Step 1: Light pencil sketch (Skip if you purchased one of our watercolor art kits)
- Lightly sketch the rooster’s head, comb, beak, rounded body, and long curved tail feathers.
- Draw the two legs and feet, keeping their placement simple.
- Outline the wing feathers with loose, overlapping shapes.
- Add a light ground line and a few grass tufts.
Tip: Focus on the silhouette first. The sweeping tail and upright comb give the rooster its character.
Step 2: First washes
- Paint the body and legs with a diluted yellow wash.
- Apply a light orange wash to the body feathers.
- Use a pale red wash for the comb and wattles.
- Paint the tail with a light mixture of light green and light blue.
- Add a very pale green and brown wash to the ground.
Tip: Keep these first layers transparent. Leave small areas of white paper to preserve highlights.
Step 3: Build the feathers
- Layer orange and yellow over the body to create warm golden feathers.
- Add red and dark red to deepen the comb and wattles.
- Build the tail feathers with green, dark green, and blue.
- Paint the beak with yellow and a touch of brown.
- Use short, curved brushstrokes that follow the direction of each feather.
Tip: Work from the back feathers toward the front so the overlapping layers look natural.
Step 4: Add details
- Add darker orange and brown strokes between the body feathers.
- Define the wing with overlapping feather shapes in orange, dark red, and brown.
- Deepen the tail feathers with blue-green strokes.
- Paint the eye dark brown or nearly black, leaving a tiny white highlight.
- Add definition to the beak, legs, and feet.
Tip: You don’t need to outline every feather. A few carefully placed dark strokes will suggest texture.
Step 5: Deepen the shadows
- Mix brown and gray for shadows beneath the wing and belly.
- Add deeper green-blue mixtures to the underside of the tail feathers.
- Darken the areas beneath the comb, around the eye, and under the wattles.
- Add shadows beneath the body and around the feet.
- Strengthen the ground with green and brown.
Tip: Keep the darkest colors in the spaces between feathers and beneath the body. This creates depth without making the rooster look flat.
Step 6: Final touches
- Add fine feather strokes with a small round brush.
- Brighten the golden body feathers with selective yellow-orange accents.
- Refine the eye, beak, comb, and wattles.
- Add a few dark accents to the tail for contrast.
- Finish with loose grass blades and small ground details.
- Let the painting dry completely before removing any visible pencil marks.
Tip: Stop before every feather is detailed. Let the transparent washes and varied brushstrokes do most of the work.
The secret to this painting: Build the rooster with warm, overlapping feather strokes, then contrast those golden oranges with the cool blue-green tail. That contrast is what makes the bird stand out.