
Quick Watercolor Tip: Light vs. Dark Colors
To create light colors, such as light red, add more water and use less pigment. To create dark, rich colors, such as dark blue, use more pigment and less water. You can also mix in a tiny amount of black to darken a color, but use it sparingly—black can quickly overpower the original color and make it look muddy. Add a little at a time until you achieve the shade you want.
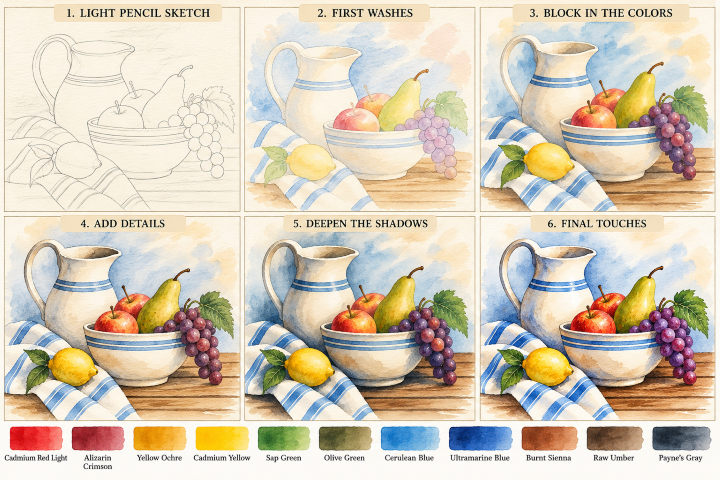
Follow these six steps to paint your still life in watercolor, starting with a light sketch and building up transparent washes, rich fruit colors, and soft shadows.
Step 1: Light pencil sketch (Skip if you purchased one of our watercolor art kits)
- Lightly sketch the pitcher on the left, including its handle, opening, and curved body.
- Draw the bowl in front, with its rim and blue stripe bands.
- Arrange the apples, pear, grapes, and leaves inside and around the bowl.
- Sketch the lemon and its leaves on the towel.
- Draw the towel’s flowing folds and stripes, then mark the wooden tabletop.
Tip: Start with the largest shapes before adding the fruit. Check that the pitcher and bowl look rounded, and keep the pencil lines light.
Step 2: First washes
- Paint the background with a diluted blue wash, leaving some soft white areas.
- Apply a pale yellow wash to the pitcher and bowl, leaving their brightest areas white.
- Add light yellow to the lemon and pear.
- Paint the apples with a pale red wash and the grapes with diluted purple.
- Use a very light green wash for the leaves.
- Keep the towel mostly white, adding only pale blue to its stripes and folds.
Tip: Use plenty of water and very little pigment. Let this first layer dry before adding stronger colors.
Step 3: Block in the colors
- Deepen the apples with red and touches of orange.
- Layer yellow and green on the pear, keeping its upper area lighter.
- Add purple and a little dark red to the grapes.
- Paint the lemon with yellow, leaving a small highlight.
- Add blue to the pitcher and bowl stripes.
- Begin the wood tabletop with yellow and brown.
Tip: Paint each fruit with a lighter side and a darker side to suggest its round shape.
Step 4: Add details
- Paint the pitcher handle and rim with a mixture of yellow and brown.
- Add soft gray-blue shadows along the pitcher and bowl edges.
- Darken the blue stripes with dark blue.
- Add individual grape shapes, varying their purple tones.
- Paint the leaves with green and dark green, adding a few central veins.
- Add the towel’s blue stripes, following the direction of each fold.
- Use short, broken strokes of brown to suggest the tabletop’s wood grain.
Tip: Keep the ceramic edges fairly smooth, but let the fruit and leaves have more varied, organic brushstrokes.
Step 5: Deepen the shadows
- Mix blue with a little gray for cool shadows on the pitcher, bowl, and white towel.
- Deepen the undersides of the apples and pear with brown and darker fruit colors.
- Add deeper purple to the grapes where they overlap.
- Use green mixed with a little Payne’s gray for shadows beneath the leaves.
- Darken the tabletop directly beneath the bowl, lemon, and pitcher.
- Add dark brown to the deepest wood-grain lines.
Tip: Shadows help separate overlapping objects. Concentrate them beneath the bowl rim, between the grapes, and where the fruit touches the bowl.
Step 6: Final touches
- Refine the apple stems and pear stem with a fine brush and dark brown.
- Leave small white highlights to the grapes and apples by preserving the paper.
- Strengthen the brightest yellow areas on the lemon.
- Add a few fine leaf veins and darker green accents.
- Sharpen selected blue stripes on the pitcher, bowl, and towel.
- Add a few final wood-grain marks and soften any overly harsh background edges.
- Let the painting dry completely before erasing any remaining pencil lines.
Tip: Don’t outline every object. A few crisp edges combined with soft shadows will give the painting a more natural watercolor appearance.
Three important tips
- Save the whites. Keep the brightest areas of the pitcher, bowl, towel, and fruit unpainted whenever possible.
- Work in layers. Let the first washes dry before adding darker colors to avoid muddying the fruit and ceramic.
- Paint the shadows last. Cool blue-gray shadows will make the white ceramics look rounded and help the fruit stand out.
The secret to this painting is balancing the warm fruit and wooden table against the cool blue stripes and soft background. Build the color gradually, and let the white paper do much of the work.