
Quick Watercolor Tip: Light vs. Dark Colors
To create light colors, such as light red, add more water and use less pigment. To create dark, rich colors, such as dark blue, use more pigment and less water. You can also mix in a tiny amount of black to darken a color, but use it sparingly—black can quickly overpower the original color and make it look muddy. Add a little at a time until you achieve the shade you want.
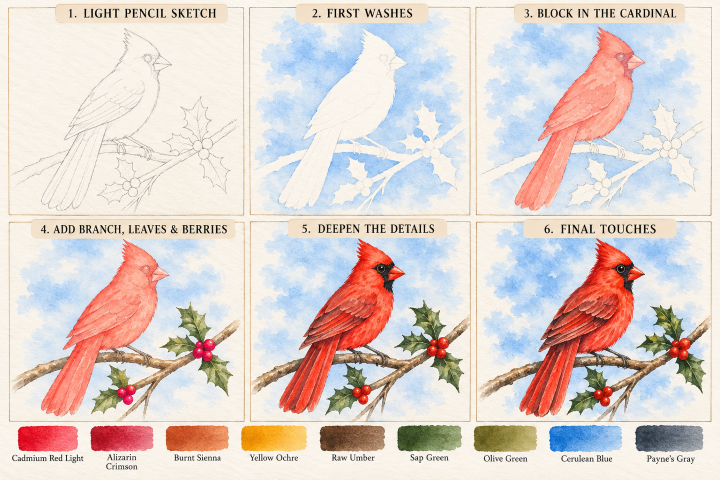
Follow these six steps to paint your cardinal, working from light washes to darker details. The goal is to capture the bird’s brilliant red feathers while keeping the painting loose and natural.
Step 1: Light pencil sketch (Skip if you purchased one of our watercolor art kits)
- Lightly sketch the cardinal’s overall shape, including the pointed crest, rounded body, long tail, wings, beak, and feet.
- Draw the branch running diagonally beneath the bird.
- Sketch the holly leaves and berry clusters.
- Keep the pencil lines faint. You don’t need to draw every feather or leaf.
Tip: Pay attention to the bird’s silhouette first. The crest and long tail are what make the cardinal recognizable.
Step 2: Paint the background
- Wet the background lightly with clean water, avoiding the bird, branch, and holly.
- Apply a diluted wash of light blue.
- Leave irregular white spaces for soft clouds.
- Allow the blue to become slightly darker in selected areas for depth.
- Let the background dry completely before painting the bird.
Tip: If you’re uncomfortable painting around the bird, paint the sky on dry paper with a smaller brush along the outline.
Step 3: Paint the cardinal’s first layer
- Mix red with plenty of water.
- Paint the crest, head, body, wings, and tail with a transparent red wash.
- Leave a few small areas unpainted or very pale to preserve highlights.
- Paint the beak with a light orange-red wash.
- Let everything dry before adding darker reds.
Tip: Follow the direction of the feathers with your brushstrokes, especially along the wings and tail.
Step 4: Add the branch, leaves, and berries
- Paint the branch with a light mixture of yellow and brown.
- Add dark brown to the underside of the branch and around its joints.
- Paint the holly leaves with light green and medium green, leaving lighter areas along the centers.
- Paint the berries with bright red.
- Leave tiny white spots on the berries for shine.
Tip: Let the green leaves dry before adding darker veins and shadows.
Step 5: Deepen the details
- Add bright red (less water) to the wings, tail, and shaded parts of the body.
- Use short, tapered strokes to suggest overlapping feathers.
- Paint the black facial mask around the beak and eye with gray or a dark neutral mix.
- Darken the eye, leaving a tiny white highlight.
- Deepen the shadows beneath the bird, around its feet, and along the branch.
- Add darker green to the holly leaves.
Tip: Don’t cover all the first red layer. The lighter red underneath creates the glow and texture of the feathers.
Step 6: Final touches
- Use a small brush to add fine feather lines along the wings and tail.
- Refine the crest with short, pointed strokes.
- Add the beak’s dark separation line and sharpen the eye.
- Add fine veins to the holly leaves and a few darker marks on the branch.
- Strengthen a few blue areas in the background if needed.
- Erase any remaining visible pencil marks only after the paper is completely dry.
Tip: Stop before every feather is outlined. A combination of soft washes and a few crisp details will make the cardinal look more natural.