
Quick Watercolor Tip: Light vs. Dark Colors
To create light colors, such as light red, add more water and use less pigment. To create dark, rich colors, such as dark blue, use more pigment and less water. You can also mix in a tiny amount of black to darken a color, but use it sparingly—black can quickly overpower the original color and make it look muddy. Add a little at a time until you achieve the shade you want.
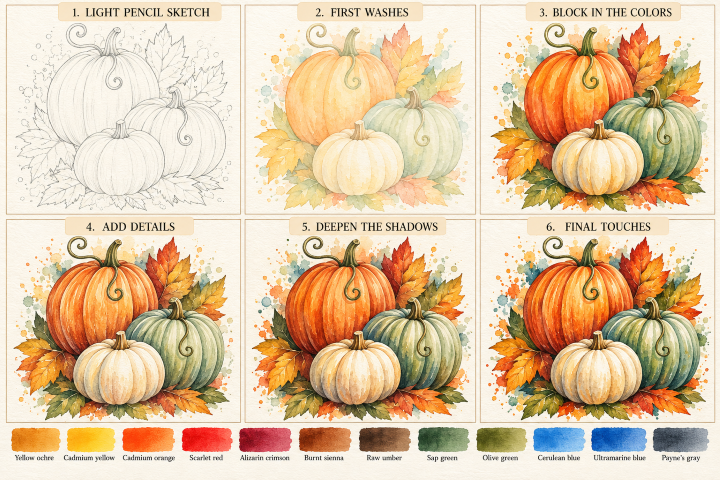
Follow these six steps to build the painting from a simple pencil sketch to the finished watercolor.
Step 1: Light pencil sketch (Skip if you purchased one of our watercolor art kits)
- Lightly sketch three overlapping pumpkins. Place the large orange pumpkin toward the upper left, the green pumpkin on the right, and the smaller white pumpkin in front.
- Draw the rounded outer shapes, then add curved lines from the stems down each pumpkin to define the individual ribs.
- Sketch the stems, including the curly vines on the orange and green pumpkins.
- Draw the large autumn leaves behind and beneath the pumpkins.
- Keep the outlines light and simple.
Tip: Draw the pumpkins as rounded, slightly flattened circles. The overlapping shapes help establish depth before you begin painting.
Step 2: First washes
- Paint the large pumpkin with a light wash of yellow mixed with plenty of water.
- Apply a very pale green wash to the green pumpkin.
- Leave most of the white pumpkin the natural color of the paper, adding only a light wash of yellow.
- Paint the leaves with diluted yellow, orange, and green.
- Add a few soft background splashes of pale brown and blue-green.
Tip: Keep this first layer light and transparent. Save the brightest areas of each pumpkin by leaving some paper unpainted.
Step 3: Block in the colors
- Layer orange and yellow onto the large pumpkin, following the curve of each rib.
- Add light green and a touch of blue to the green pumpkin.
- Paint the white pumpkin with pale yellow and diluted brown, leaving its central ribs bright.
- Add yellow, orange, and red to the autumn leaves.
- Paint the stems with green and dark brown.
Tip: Leave narrow lighter strips along the center of selected ribs. These highlights help the pumpkins look rounded.
Step 4: Add details
- Use a small round brush to add darker orange strokes between the ribs of the large pumpkin.
- Add darker green strokes along the grooves of the green pumpkin.
- Shade the white pumpkin with warm gray-brown mixtures, especially where it overlaps the other pumpkins.
- Add veins to the leaves using a fine brush and darker green or brown.
- Deepen the stems and carefully paint the curly vines with dark brown mixed with green.
Tip: Follow the natural curve of each pumpkin rib with your brushstrokes. Avoid straight vertical lines, which can make the pumpkins look flat.
Step 5: Deepen the shadows
- Mix brown with dark red to deepen the shadows between the orange pumpkin’s ribs.
- Add light green mixed with gray to the darker grooves of the green pumpkin.
- Deepen the shadows beneath the white pumpkin and along its lower edges using diluted brown.
- Darken the leaves where they overlap and where they disappear behind the pumpkins.
- Add darker brown beneath the stems and between the overlapping pumpkins.
- Strengthen the ground foliage with green, brown, and a little yellow.
Tip: Place the darkest shadows where the pumpkins touch or overlap. This makes the arrangement feel three-dimensional without outlining everything.
Step 6: Final touches
- Add fine, darker lines to a few pumpkin ribs to emphasize their shape.
- Brighten selected orange ribs with transparent yellow.
- Add a few pale highlights to the green and white pumpkins by lifting paint with a clean, damp brush.
- Refine the curly vines and stems with a fine brush.
- Add small details to the autumn leaves, including veins and darker tips.
- Finish with loose orange, yellow, and green splatters around the composition.
- Allow the painting to dry completely before erasing any remaining pencil marks.
Tip: Don’t add the same amount of detail everywhere. Keep the brightest highlights on the pumpkins and concentrate the darkest shadows in the overlaps.
Three tips for success
- Build the ribs with light and dark. Keep the center of each rib lighter and the grooves darker to create a rounded appearance.
- Keep the white pumpkin warm. Use soft cream, pale yellow, and subtle gray-brown shadows rather than painting it pure white or dark gray.
- Layer slowly. Allow each wash to dry before adding stronger colors so the pumpkins stay luminous and the autumn colors remain clean.
The secret to this painting is the contrast between the vibrant orange pumpkin, the cool sage-green pumpkin, and the soft cream pumpkin. Let the paper provide the highlights, and use deeper colors only where you need to create depth.