
Quick Watercolor Tip: Light vs. Dark Colors
To create light colors, such as light red, add more water and use less pigment. To create dark, rich colors, such as dark blue, use more pigment and less water. You can also mix in a tiny amount of black to darken a color, but use it sparingly—black can quickly overpower the original color and make it look muddy. Add a little at a time until you achieve the shade you want.
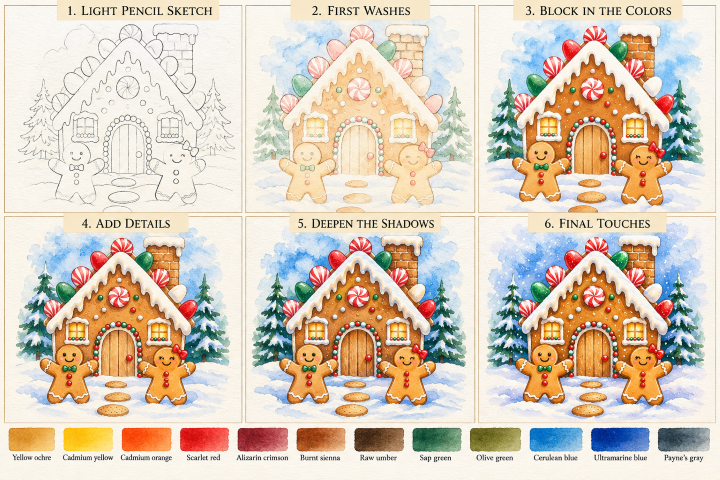
Paint this festive gingerbread house with candy decorations, snowy icing, evergreen trees, and two cheerful gingerbread people. Work from light washes to richer colors, adding the small details and shadows near the end.
Step 1: Light pencil sketch (Skip if you purchased one of our watercolor art kits)
- Lightly sketch the triangular roof, rectangular house, chimney, windows, and rounded doorway.
- Draw the thick icing along the roof edges, allowing it to drip in uneven scallops.
- Add the round peppermint candies and gumdrops along the roof.
- Sketch the two gingerbread people in front of the house, including their arms, legs, faces, and buttons.
- Add the evergreen trees, snowy ground, and stepping-stone path.
Tip: Start with the largest shapes first. Keep the pencil lines light, especially where you plan to leave white icing and snow.
Step 2: First washes
- Apply a diluted yellow wash to the house walls and gingerbread people.
- Paint the roof chimney with a light brown wash.
- Add pale yellow to the windows, leaving small areas of white for highlights.
- Use a very light blue wash for the sky and snow shadows.
- Paint the evergreen trees with diluted green.
- Keep the icing and snow mostly white.
Tip: Use plenty of water and let the first layer dry before adding stronger colors. The white paper will provide the brightest highlights.
Step 3: Block in the colors
- Layer brown and orange onto the gingerbread house.
- Add yellow to the gingerbread people, leaving their centers slightly lighter.
- Paint the roof candies with red, gumdrops with green, and peppermint swirls with red and white sections.
- Add warm brown to the chimney bricks.
- Paint the trees with green and dark green.
- Strengthen the window glow with yellow.
Tip: Keep the candy colors bright and distinct. Leave the white peppermint stripes and icing unpainted wherever possible.
Step 4: Add details
- Use a small round brush to paint the chimney’s individual bricks with brown and dark brown .
- Define the roof icing with soft gray-blue and warm brown shadows beneath the drips.
- Add the door’s vertical wood-grain lines using dark brown.
- Paint the gumdrop and peppermint details, including curved stripes and small highlights.
- Leave paper unpainted for white icing trim to the windows and gingerbread people.
- Paint the gingerbread faces, bows, buttons, and smiles.
- Add individual branches and snowy tips to the evergreen trees.
Tip: Use a fine brush for the candy decorations and facial features. Tiny details make the scene charming, but you don’t need to outline everything.
Step 5: Deepen the shadows
- Mix brown with gray to deepen the gingerbread walls and the spaces beneath the roof.
- Add darker brown around the doorframe, chimney bricks, and house corners.
- Deepen the shadows on the gingerbread people beneath their arms and along their legs.
- Use blue mixed with gray for the shadows in the snow.
- Add darker green to the evergreen trees, especially beneath the snowy branches.
- Deepen the shadows beneath the stepping stones and around the base of the house.
Tip: Concentrate the darkest shadows where objects overlap and where the roof meets the walls. This gives the house depth without making it look flat.
Step 6: Final touches
- Refine the icing drips with a fine brush, keeping the edges irregular and soft.
- Add small dots and crumbs to the gingerbread walls and people.
- Strengthen the windows with warm yellow and orange.
- Add scattered white snowflakes and small blue-gray shadows across the ground.
- Finish with a few soft blue and green background splatters.
- Let the painting dry completely before erasing any remaining pencil lines.
Tip: Keep the snow and icing bright. A few delicate shadows will make them look raised and fluffy without losing their white appearance.
Three tips for success
- Save the white areas. Preserve the icing, snow, and peppermint stripes by leaving the paper unpainted.
- Build the gingerbread color in layers. Begin with yellow, then add orange and brown to create a toasted-cookie appearance.
- Make the candy shine. Leave tiny white highlights on round candies and gumdrops to make them look glossy.
The secret to this painting is the contrast between the warm golden gingerbread, bright red and green candy, and cool blue snow. Build the colors gradually, and let the white paper create the snowy, sugary details.