
Quick Watercolor Tip: Light vs. Dark Colors
To create light colors, such as light red, add more water and use less pigment. To create dark, rich colors, such as dark blue, use more pigment and less water. You can also mix in a tiny amount of black to darken a color, but use it sparingly—black can quickly overpower the original color and make it look muddy. Add a little at a time until you achieve the shade you want.
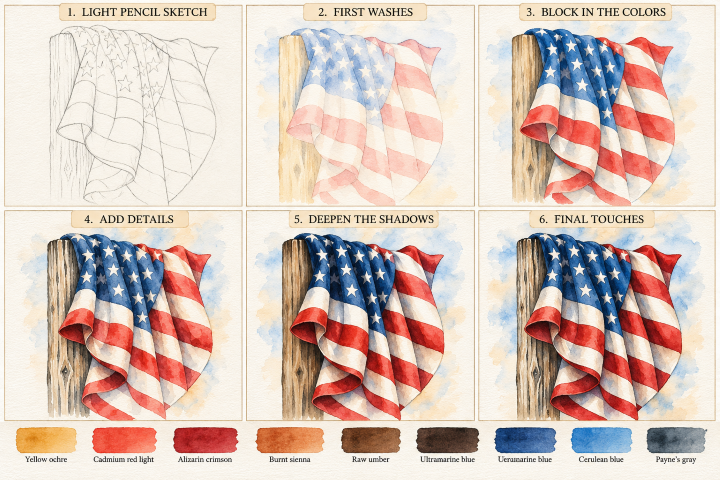
This painting is all about capturing the flowing folds of the flag, the contrast between red, white, and blue, and the weathered texture of the wood. Work from light washes to darker shadows, saving the brightest white areas for the stars and fabric highlights.
Step 1: Light pencil sketch (Skip if you purchased one of our watercolor art kits)
- Lightly draw the wooden post on the left side of the paper.
- Sketch the flag draped over the top, flowing down in several loose folds.
- Mark the blue star field and the alternating red and white stripes.
- Draw the stars simply, keeping them spaced across the blue section.
- Use curved lines to show where the fabric bends, overlaps, and hangs.
Tip: Follow the large folds first. Don’t draw every wrinkle—just identify the major curves and overlapping sections of fabric.
Step 2: First washes
- Wet the background lightly and add a pale wash of light blue, leaving irregular areas of white paper.
- Paint the wooden post with a diluted yellow wash.
- Add a very light blue wash to the shadowed white stripes.
- Apply a pale red wash to the red stripes.
- Keep the blue star field light for now, preserving the white stars.
Tip: Keep these first layers transparent. The white stripes should remain mostly the natural color of the paper.
Step 3: Block in the colors
- Paint the blue field with blue, working carefully around the stars.
- Layer bright red light over the red stripes.
- Follow the direction of the fabric folds with your brushstrokes.
- Add yellow and a little brown to the wooden post.
- Leave lighter areas on the fabric and wood for highlights.
Tip: Let the blue field and red stripes dry before adding another layer. This will help keep the colors clean and distinct.
Step 4: Add details
- Add a second layer of red to selected stripes, especially where the fabric curls underneath.
- Use dark red for the darker red folds.
- Add vertical and irregular brown strokes to the wood to suggest grain.
- Paint the smaller creases with diluted blue or a blue-gray mixture.
- Strengthen the edges of the stars and the boundaries between the stripes where needed.
Tip: Think of the fabric as a series of rounded ridges and valleys. The ridges stay light; the valleys receive the darker colors.
Step 5: Deepen the shadows
- Mix blue with a little gray for the deepest blue shadows.
- Deepen the underside of the curled fabric and the areas where the flag overlaps itself.
- Add dark red to the darkest red folds.
- Use brown and dark brown to deepen the wood grain and the shadow along the post’s edge.
- Add soft blue-gray shadows to the white stripes, following each fold.
Tip: Shadows should follow the direction of the fabric. Avoid outlining every stripe with a dark line, which can make the flag look flat.
Step 6: Final touches
- Refine the stars, keeping them bright and crisp against the blue field.
- Add a few thin, dark wood-grain marks and knots to the post.
- Strengthen selected red and blue shadows for contrast.
- Use a clean, damp brush to soften any harsh shadow edges that distract from the fabric.
- Add a few pale blue and warm yellow touches to the background to balance the composition.
- Let the painting dry completely before removing any visible pencil marks.
Tip: Stop before every wrinkle is detailed. A few strong shadows and preserved highlights will create a convincing sense of movement.
Three techniques to remember
- Paint the folds, not just the stripes. Let each red and white stripe curve around the fabric’s shape.
- Preserve your whites. The stars and brightest fabric highlights are easiest to maintain by leaving the paper unpainted.
- Build color gradually. Several transparent washes will create richer color and more depth than one heavy layer.
The most important part of this painting is the contrast between the bright stripes and the dark valleys of the fabric. Take your time with those folds, and the flag will appear to drape naturally over the wooden post.