
Quick Watercolor Tip: Light vs. Dark Colors
To create light colors, such as light red, add more water and use less pigment. To create dark, rich colors, such as dark blue, use more pigment and less water. You can also mix in a tiny amount of black to darken a color, but use it sparingly—black can quickly overpower the original color and make it look muddy. Add a little at a time until you achieve the shade you want.
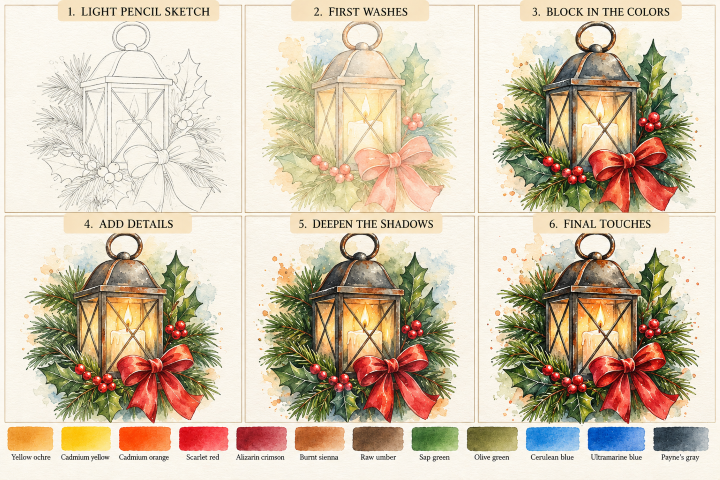
Follow these six steps to paint your Christmas lantern with a candle, evergreen branches, holly berries, and a red bow.
1. Light Pencil Sketch (Skip if you purchased one of our watercolor art kits)
Lightly draw the lantern, including the round handle, domed top, rectangular glass panels, and candle inside. Sketch the pine branches, holly leaves, berries, and large bow around the lantern. Keep your pencil lines light so they won’t show through the paint.
2. First Washes
Use diluted Yellow to lightly wash the wooden and brass areas. Add a pale wash of Blue around the background. Paint a soft golden glow inside the lantern with diluted Yellow. Use light green washes for the foliage and a pale red wash for the bow. Let everything dry before continuing.
3. Block in the Colors
Paint the lantern frame with brown and Gray, leaving thin highlights along the metal edges. Build the candle with warm diluted brown and yellow tones. Add Green and dark Green to the pine and holly leaves. Paint the berries and bow with Red and dark red. Keep the lightest areas unpainted.
4. Add Details
Add individual pine needles using short, tapered brushstrokes. Define the pointed holly leaves and their veins. Paint the berries with rounded strokes, leaving tiny white highlights. Add folds to the bow with curved red strokes, and define the candle’s wax drips and flame.
5. Deepen the Shadows
Once the paint is dry, deepen the lantern’s metal frame with Gray and brown. Add darker green tones beneath overlapping leaves and between pine needles. Dark red for the deepest folds of the bow and darker red tones on the berries. Add warm brown shadows beneath the candle and along the lantern’s edges.
6. Final Touches
Add thin highlights to the lantern frame and handle with a small brush or white paint. Brighten the candle flame with yellow and leave a small white center. Leave tiny white highlights to the berries and bow. Finish with a few loose watercolor splatters in muted blue, green, and warm yellow around the arrangement. Let the painting dry completely.
Tip: Work from light to dark, and let each layer dry before adding stronger colors. The contrast between the warm candlelight and the cool shadows is what makes the lantern glow.