
Quick Watercolor Tip: Light vs. Dark Colors
To create light colors, such as light red, add more water and use less pigment. To create dark, rich colors, such as dark blue, use more pigment and less water. You can also mix in a tiny amount of black to darken a color, but use it sparingly—black can quickly overpower the original color and make it look muddy. Add a little at a time until you achieve the shade you want.
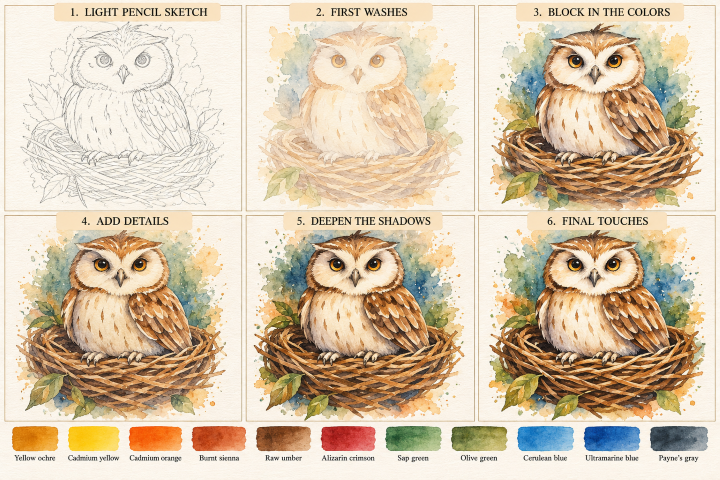
Step 1: Light pencil sketch (Skip if you purchased one of our watercolor art kits)
- Lightly sketch the owl’s rounded head, body, wings, and facial discs.
- Draw two large eyes, a small pointed beak, and the feather tufts above the eyes.
- Sketch the overlapping twigs that form the nest.
- Add a few leaves around the bottom and sides.
- Keep all pencil lines light.
Tip: Focus on the owl’s silhouette and the placement of its eyes. They give the owl its distinctive expression.
Step 2: First washes
- Apply a light yellow wash to the owl’s chest and face.
- Add a pale brown wash to the head and wings.
- Use diluted brown on the nest twigs.
- Paint the background with soft washes of blue, green, and brown .
- Leave the brightest areas of the face and chest mostly white.
Tip: Use plenty of water and let the first washes dry before layering more color.
Step 3: Block in the colors
- Build the head and wings with yellow and brown .
- Add dark brown to the darker feather areas.
- Paint the eyes with yellow around the irises and dark brown in the pupils, preserving tiny white highlights.
- Add warm brown to the nest and green to the leaves.
- Strengthen the blue-green background behind the owl.
Tip: Keep the owl’s chest lighter than its wings to create contrast.
Step 4: Add details
- Use short, curved strokes to suggest individual feathers on the wings.
- Add soft brown markings to the chest and facial discs.
- Define the feather tufts above the eyes.
- Add darker lines to individual nest twigs so they appear to overlap.
- Refine the beak, toes, and claws with a small brush.
Tip: Follow the direction of the feathers with your brushstrokes rather than outlining every feather.
Step 5: Deepen the shadows
- Mix brown and dark brown for the darkest wing feathers.
- Add soft shadows around the facial discs and beneath the brow.
- Darken the nest where the twigs overlap and beneath the owl’s body.
- Strengthen the shadows around the eyes and beak.
- Deepen selected blue-green areas of the background.
Tip: Save the darkest values for the eyes, wing markings, and spaces between the twigs. These create depth and definition.
Step 6: Final touches
- Add tiny highlights to the eyes using preserved white paper or carefully lifted paint.
- Refine the feather tips with a fine brush.
- Add a few light strokes to the chest and wing edges.
- Strengthen the leaf veins and a few nest details.
- Add small blue, green, and yellow splatters around the background.
- Let the painting dry completely before removing any remaining pencil marks.
Tip: Keep the face soft and bright while allowing the wings and nest to carry most of the darker detail.
The key to this painting: Keep the face and chest light, build the feathers with layered brown strokes, and use darker values around the eyes and nest to bring the owl to life.