
Quick Watercolor Tip: Light vs. Dark Colors
To create light colors, such as light red, add more water and use less pigment. To create dark, rich colors, such as dark blue, use more pigment and less water. You can also mix in a tiny amount of black to darken a color, but use it sparingly—black can quickly overpower the original color and make it look muddy. Add a little at a time until you achieve the shade you want.
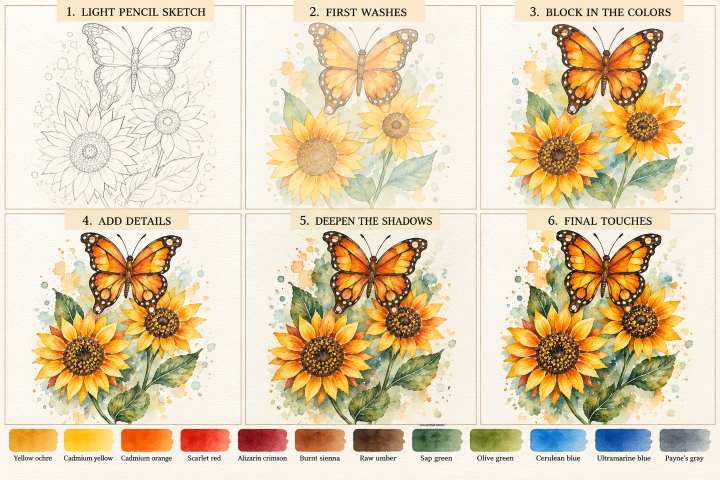
This painting combines bright golden sunflowers, a vibrant orange monarch butterfly, and soft green foliage. Follow these six steps to build the painting from a light pencil sketch to the finished watercolor.
Step 1: Light pencil sketch (Skip if you purchased one of our watercolor art kits)
- Lightly sketch the butterfly near the top of the page, with its wings spread open.
- Draw the two sunflowers below it, making one larger than the other.
- Outline the petals with simple pointed shapes and add a circle for each flower center.
- Sketch the stems, leaves, and a few background splatters.
- Mark the butterfly’s wing borders and the main veins that divide its wings.
Tip: Keep your pencil marks light. Focus on the overall composition and wing shapes rather than drawing every detail.
Step 2: First washes
- Apply a pale wash of pale yellow and yellow to the sunflower petals.
- Paint the butterfly wings with a diluted yellow-orange wash, leaving the small white spots unpainted.
- Add a light green wash to the leaves and stems.
- Use a pale brown wash for the sunflower centers.
- Dab soft, diluted blue and green around the flowers for the background.
- Allow the painting to dry before adding stronger colors.
Tip: Use plenty of water during this stage. The light washes will create a luminous foundation for the brighter colors.
Step 3: Block in the colors
- Layer yellow and orange onto the sunflower petals.
- Vary the colors from bright yellow near the tips to deeper orange near the flower centers.
- Add orange and red to the butterfly’s wings, keeping the outer borders dark but leaving the white spots clear.
- Paint the sunflower centers with dark brown and brown.
- Build the leaves with light green and dark green.
- Add a little more blue-green pigment to the background.
Tip: Paint individual petals with separate strokes, leaving thin lighter gaps between some of them to suggest light.
Step 4: Add details
- Use a small round brush to paint the butterfly’s dark brown or nearly black wing borders.
- Add thin dark veins radiating outward from the butterfly’s body.
- Preserve or carefully restore the white spots along the wing edges.
- Add overlapping orange and yellow strokes to the sunflower petals.
- Dab small brown and golden dots into the sunflower centers to suggest seeds.
- Add leaf veins with a darker green and refine the stems.
Tip: The butterfly’s dark outlines contrast with its orange wings. Keep the veins crisp, but avoid making every line equally thick.
Step 5: Deepen the shadows
- Mix dark brown with dark red to deepen the orange petals near their bases.
- Add darker brown to the undersides of overlapping petals.
- Deepen the sunflower centers with brown and gray.
- Add darker green to the leaves, especially where they overlap or fold.
- Strengthen the butterfly’s dark wing borders and body.
- Add a few deeper blue-green patches to the background behind the flowers.
Tip: Concentrate your darkest colors around the flower centers, beneath overlapping petals, and along the butterfly’s wing edges. This will give the painting depth.
Step 6: Final touches
- Add the butterfly’s slender body, antennae, and final wing details with a fine brush.
- Brighten selected sunflower petals with small strokes of transparent yellow.
- Add tiny golden highlights among the dark sunflower seeds.
- Refine the leaf veins and add a few dark green accents.
- Add scattered orange, yellow, and muted green splatters around the composition.
- Lift a little paint from selected areas if you need to restore highlights.
- Let the painting dry completely before removing any remaining pencil marks.
Tip: Don’t overwork the background. Soft, irregular washes and a few splatters will complement the detailed butterfly and sunflowers without competing with them.
Three techniques to remember
- Save the white spots. Leave the monarch’s small wing markings unpainted so they remain bright and clean.
- Layer the petals. Start with yellow, then add orange and warm shadows near the centers to create depth.
- Balance detail and looseness. Keep the butterfly’s wing markings crisp while allowing the foliage and background to remain soft and organic.
The key to this painting is the contrast between the glowing yellow-orange flowers, the vivid monarch wings, and the dark centers and wing borders. Build those contrasts gradually, and let the white paper provide the brightest highlights.